Saturday, May 5, 2012

The Windows Installer Service Could Not Be Accessed" error message when you install a program in Windows XP

To resolve this issue, follow these steps:
    Log on to your computer as an administrator.
    Click Start, and then click Run.
    In the Open box, type cmd, and then click OK.
    At the command prompt, typemsiexec.exe /unregister, and then press ENTER.
    Type msiexec /regserver, and then press ENTER.
    Verify that the SYSTEM account has full control access permissions to the
    HKEY_CLASSES_ROOT
    hive in the Windows registry. In some cases, you may also have to add Administrator accounts. To do so:Important This section, method, or task contains steps that tell you how to modify the registry. However, serious problems might occur if you modify the registry incorrectly. Therefore, make sure that you follow these steps carefully. For added protection, back up the registry before you modify it. Then, you can restore the registry if a problem occurs. For more information about how to back up and restore the registry, click the following article number to view the article in the Microsoft Knowledge Base:
    322756  How to back up and restore the registry in Windows
        Click Start, click Run, type regedit in the Open box, and then click OK.
        Click the following registry hive:
        HKEY_CLASSES_ROOT
        On the Edit menu, click Permissions.
        If SYSTEM is not listed in the Group or user names list, click Add, make sure that the local computer name appears in the From this location box, type system in the Enter the object names to select box, click Check Names, and then click OK.
        Click SYSTEM in the Group or user names list, and then select the Full Control check box under Allow in the Permissions for SYSTEM box.
        Click Apply, click OK, and then quit Registry Editor.
    Restart the computer. If the problem is not resolved, repair Windows XP. For more information about how to repair Windows XP, click the following article number to view the article in the Microsoft Knowledge Base:

Monday, December 12, 2011


Saturday, September 17, 2011

How to create multiple network profiles on Windows XP/2000

How to create multiple network profiles on Windows XP/2000.

I’ve been meaning to figure out how to do this…it was always easy to do on Macintosh systems. Someone else blogged about it for me here

I normally just use DHCP everywhere I connect. But sometimes I need special configs for networks that don’t have a DHCP server running. The problem with those special configs is that they just waste time when you need to go back to the office or your home network. Nothing works and it takes you a few minutes to remember you hosed your network settings to connect to some obscure network somewhere.

In case that link ever dies, the original content follows …

  1. First, save your network profile with all you need (ip, subnet, gateway, dns, wins…)
  2. Now you can open a DOS shell with start -> run; then type cmd
  3. On shell write: netsh -c interface dump > c:/windows/system32/homesettings.txt
    the path is optional, you save this as you want, and also the name of file (homenetwork.txt) can be different.
  4. Now you can setup a different netrwok, like the first profile, and repeat the point 3.
  5. On you Desktop, in a free area, click on right button of mouse and choose new -> link
  6. write: %windir%\system32\netsh.exe -f c:\windows\system32\homesettings.txt
  7. Next write the name of link that appear as title of icon, eg: home
  8. Repeat the step 6 and 7 for other network, change the name of txt in step six… )
  9. you are ready, if you want, you can change the two new icons on desktop, with right button, properties, change icon (the default icon file is c:/windows/system32/shell32.dll).

Tuesday, January 25, 2011

Windows XP offers the ability to save passwords for web sites and network resources

1. Click Start and select Run

2. In the Open field type "rundll32.exe keymgr.dll, KRShowKeyMgr"

3. Once the Stored Usernames and Passwords interface opens you can select any of the entries and select Properties to view the existing information

4. To remove a saved password you can select one of the entries and select Remove. A confirmation screen will appear. Click on OK and the account will be removed

5. You can add additional saved passwords as well by clicking on the Add button and entering the appropriate information

6. Repeat the steps above as needed to add, remove or edit saved passwords

7. When you are done using the interface click the Close button

Windows XP restarts when you try to shut down your computer


When you shut down your Microsoft Windows XP-based computer, your computer may restart instead of shutting down, and a Stop error may briefly appear before the computer restarts.

CAUSE
This issue may occur if the following conditions are true: You have "automatica...

This issue may occur if the following conditions are true:
  • You have "automatically restart" selected.
  • The Roxio Easy CD Creator 5.0 or Direct CD 5.0 program is installed on your computer.

RESOLUTION
To resolve this issue, contact Roxio, or visit the following Roxio Web site to...

To resolve this issue, contact Roxio, or visit the following Roxio Web site to download and install the updated driver for Easy CD Creator 5.0 for Windows XP:
http://www.roxio.com (http://www.roxio.com)
Microsoft provides third-party contact information to help you find technical support. This contact information may change without notice. Microsoft does not guarantee the accuracy of this third-party contact information.

To work around this issue, remove Roxio Easy CD Creator or Direct CD.

MORE INFORMATION
Windows XP may experience a problem during startup that causes a Stop error mes...

Windows XP may experience a problem during startup that causes a Stop error message. Depending on the system configuration, the Stop error message may appear too briefly to record the error information. To gather important information about the Stop error message and to verify the cause, follow these steps:
  1. Right-click My Computer, and then click Properties.
  2. On the Advanced tab, click Settings under Startup and Recovery.
  3. Clear the Automatically restart check box under System failure, and then click OK. The error message should remain on the screen so that you can record the error information.

"Stop 0x0000000a(0x00000029,0x00000002,0x00000000,0x80466d7b" error message after Windows is already installed

Important This section, method, or task contains steps that tell you how to modify the registry. However, serious problems might occur if you modify the registry incorrectly. Therefore, make sure that you follow these steps carefully. For added protection, back up the registry before you modify it. Then, you can restore the registry if a problem occurs. For more information about how to back up and restore the registry, click the following article number to view the article in the Microsoft Knowledge Base:
322756 (http://support.microsoft.com/kb/322756/ ) How to back up and restore the registry in Windows


When this issue occurs, follow these troubleshooting steps:
  1. Remove the Easy CD Creator software.
  2. Click Start, click Run, type Regedit in the Open box, and then click OK.
  3. Locate the following registry key:
    HKEY_LOCAL_MACHINE\System\CurrentControlSet\Security
  4. Remove the Etetnt.mpd file that has a revision date of 1997.
  5. Locate the following registry key:
    HKEY_LOCAL_MACHINE\System\CurrentControlSet\Services
  6. Remove the following files:
    • Cdr4vsd
    • Cdralw2k
    • Cdr4_2k
    • Cdudf
For additional information, click the following article number to view the article in the Microsoft Knowledge Base:
310628 (http://support.microsoft.com/kb/310628/ ) Easy CD Creator 5.0 does not function in Windows XP
The third-party products that this article discusses are manufactured by companies that are independent of Microsoft. Microsoft makes no warranty, implied or otherwise, regarding the performance or reliability of these products.

Tuesday, December 21, 2010

Reset Windows Password

Reset Windows XP, Vista, 7 Password Using USB Drive or CD


A lot of methods are available to recover or reset the Windows password. The famous Ophcrack is used for recovering the password. Even i have posted about using Ophcrack. But the problem is that its bulky in size. We need to download a file of size 500MB to recover the password. So I thought why to recover a lost password, instead why cant we simply reset or delete the password using a 3 MB file open source program. That is what this post is about. I have not found any other method simpler than this one, it resets your password in the blink of an eye.

The method uses an open source program called Offline NT Password & Registry Editor. We can use a USB Disk Drive (Pen Drive) or burn a bootable CD for this method.

Follow the Steps below:

Step 1: Download the cd080802.zip file from the link below and extract it. It contains an ISO file.

Size: 3.15 MB

http://pogostick.net/~pnh/ntpasswd/cd080802.zip (Updated Working Link 13-01-10)

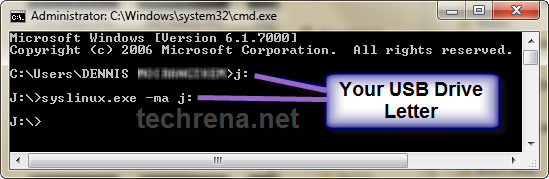
Step 2: Burn the ISO file to a CD. If you are using a USB drive, then mount the cd080802.iso file to a virtual drive. Open the Virtual Drive and Copy all the contents to your USB disk. If any error comes while copying just skip the file. Now to make the USB Drive Bootable open a Command Prompt(Press Start + R, Type cmd and enter) and type the following commands:

Sl. No.

Command:

Action:

1

j:

Enter

2

syslinux.exe –ma j:

Enter

Here j is my drive letter, you should enter your own drive letter.

View Commands Image

Step 3: Now start the System which you want to reset the password by putting the CD or the USB in the Computer. While start up you have to make sure that it boots up from the correct device i.e. from the CD or the USB. In order to do this go to your BIOS settings and change the boot order as CD or the USB drive as the first option. Or if you know the Boot menu key then press it and Boot from the correctdevice.

Note: Step 4 to Step 8 takes a very less amount of time. No need to worry!

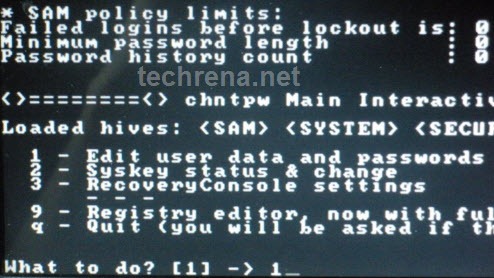
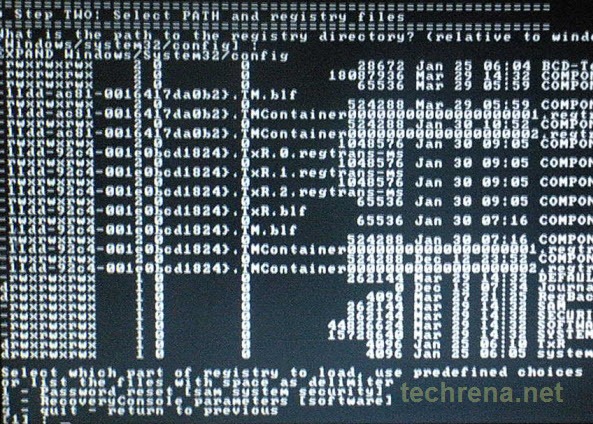
Step 4: After booting from the CD or the USB, press enter to continue the boot process. In the first step it will automatically select the disk where your windows is installed. Simply press enter to continue. In the Second Step it Will select the path and registry files. Select 1 for password reset (It will select 1 by default, just enter).

View Select Path Image

Step 5: Now after selecting the paths, It will ask “What to do?” Simply press enter as it will automatically select 1 for Edit User Password.

View Select Edit Password Menu Image

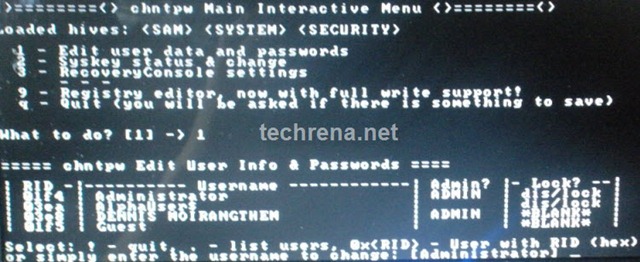
Step 6: It will show a list your system usernames and their password status. Now enter the username whose password you want to reset. It is case sensitive so, be careful and type what you see in the users list. (If the user is Administrator just press enter as it has already selected Administrator by default otherwise enter the correct username)

View Select User Menu Image

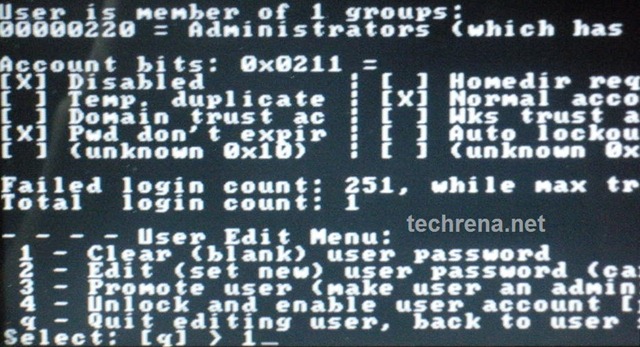
Step 7: It will show you User Edit Menu. Select 1 to clear the user password.

View User Edit Menu Image

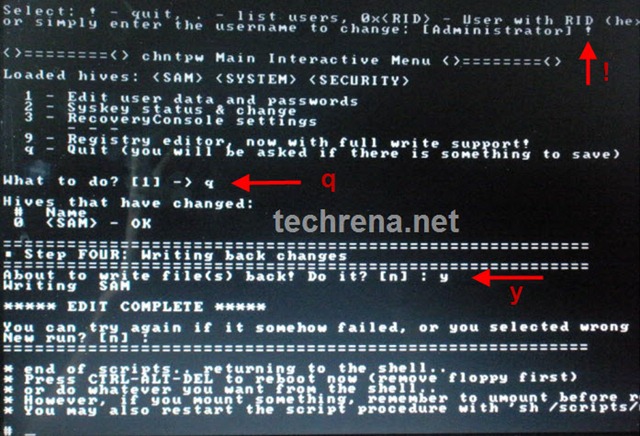
Step 8: It will clear the password. Now Enter “!” to quit from the User select menu. It will again ask “What to do?”. enter “q” to quit. Now in step four it will ask you to write the files or not. Enter “y” to write the files. It will write the files back. Now Simply press enter when it asks for “New run?” as it has selected no by default. The password reset has been successfully completed. Press the power button.

View the Final Step Imge

Now start the computer and you will find that it is not asking for password for the user you had selected. That’s it, you are done.

Important:

1. This method will remove your password not recover. If you do not want to reset the password, you can recover it. Visit: http://techrena.blogspot.com/2009/03/windows-password-recoverycrack-windows.html for password recovery.

2. The method has been tested for windows XP, Windows Vista and Windows 7 and all resulted in success.

3. This is for information purposes only. We are not responsible for any damages or illegal acts resulting from this information.

4. The information provided here should be used for legal purposes only.

5. USB Disk method will not work if your motherboard or BIOS does not support USB booting.

Monday, December 6, 2010

\\computername\ is not accessible. you might not have permission to use this resource

---- 1st solution ----

When you can not access folder, please follow .
1- Right click My Computer->Manage->Local User and groups->User->ple see user Guest and right click then properties->UnKick accound is Disable.( i mean that u unkick this guest accound is enable.)
2-start->sitting->Controlpanel->Administrative Tools->Local security policy->Local Policies->user Rights Assignmen->duble Click Deny access to this computer from the Network and then remove all list that it have(Like Guest,support_.....)

---- 2nd Solution ----

This lack of a user password has caused problems in the past with Task Scheduler not working correctly and I have modified the Registry under HKEY_LOCAL_MACHINE\SYSTEM\CurrentControlSet\Control\Lsa to change limitblankpassworduse to "0" instead of "1" to make the scheduler work correctly.

I purchased a new terabyte external hard drive that was pre-formatted as an NTFS single partition to use as a backup drive using Norton Ghost.

I regularly have shared the hard drive on one of my computers with the other two, so I am familiar with sharing and Security rights.

When the new drive was added to the main computer either as a USB attached drive or as an eSATA connection, I could read and write to the drive from the main computer. However, when I marked it as a shared drive with full rights to others, I could see it from my remote networked computer but when accessed I would get the message: " is not accessible. You might not have permission to use this network resource"

I have tried many suggestions from the web including the ones from Microsoft support. They include:
Regedit and set limitblankpasswords to zero
Regedit and set restrictanonymous to zero
be sure that the Guest account is activated
be sure that permissions are granted for the folder
share the drive as well as the folder (you are not allowed to set permissions settings on the drive)
disable simple file sharing
disable the firewall
add a password for yourself on both machines because anonymous users cannot access a shared drive.

None of these proposals along with several others that I tried ever worked.

However, I stumbled across a Security change that did work:
1. From Control Panel choose Administrative Tools> Computer Management> Storage> Disk Management
2. Right click on the drive in question
3. Choose Properties and click the Security tab
4. Click the Everyone User Group and notice that the Permissions for Administrators boxes are not checked.
5. Click on the Allow> Full Control box and then the Apply button at the bottom.
6. You can check the other users and groups in this window and allow them full use also.
7. Click OK and exit the Security window.
8. You now should be allowed access to the drive via sharing on the Workgroup network.